Import & BOM Extraction
This page covers the complete process: importing customer files, automatic bill of materials (BOM) extraction, reviewing results and final validation.
Prerequisites
- Have created an RFQ with at least one part
Process Overview
Import data with AI → Drag & Drop files → Analyze with AI
       → Extraction in progress (progress bar) → Results & adjustments
       → Validate data → Migration to production
Step 1 — Import files
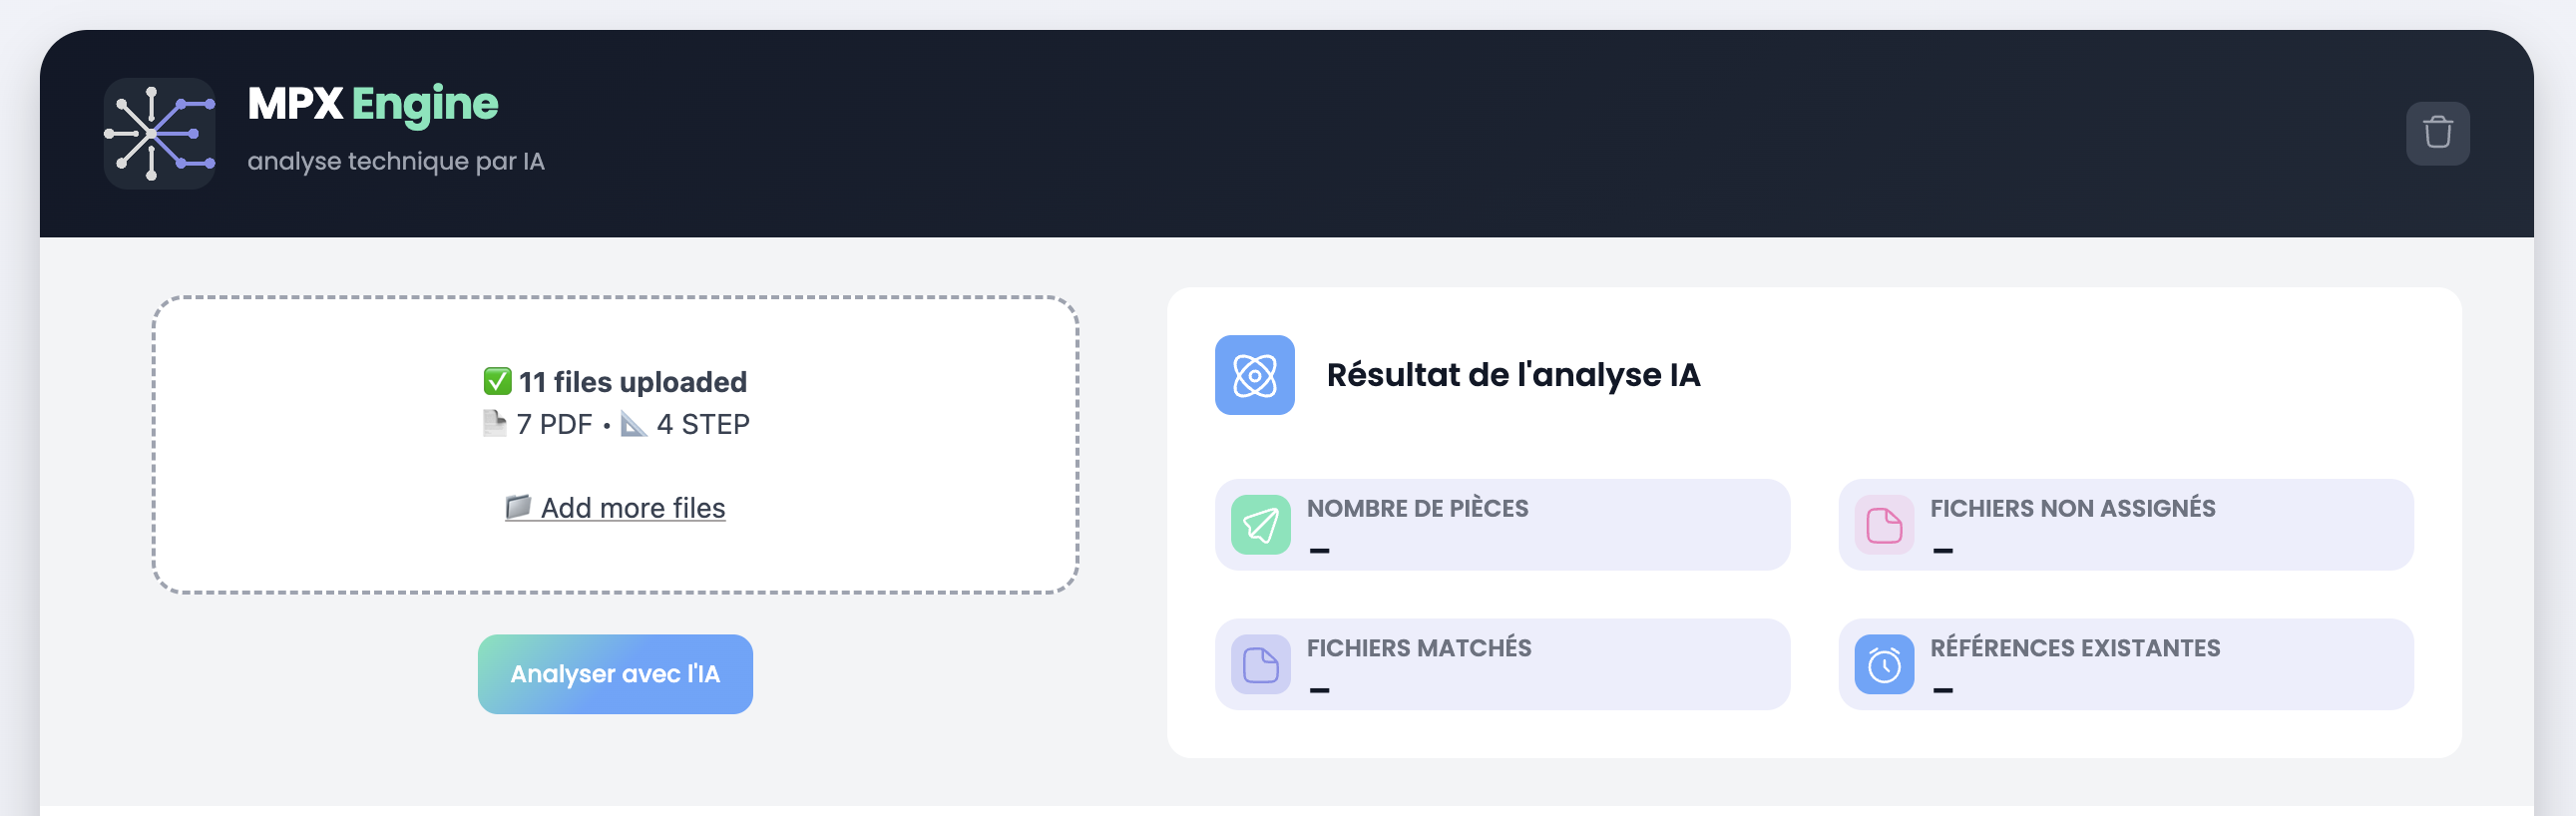
From the RFQ Overview page, in the Consultation Details section, click the Import data with AI button.

A panel opens with two areas:
- Drag & drop zone (left): drag and drop your PDF, TIFF, image and STEP files, or click Add more files to browse
- AI Analysis Result (right): displays statistics after analysis (number of parts, matched files, unmatched files, existing references)
Supported file types
| Type | Extensions | Usage |
|---|---|---|
| Drawings and BOM | .pdf, .tiff, .jpeg, .png | BOM extraction, technical specs |
| 3D Models | .step, .stp | 3D viewer, volume calculation |
TIP
You can import multiple files at once. The system displays a summary of uploaded files by type (e.g. 7 PDF · 4 STEP).
Step 2 — Launch analysis
Click the Analyze with AI button.

The system automatically performs the following operations:
- Reads the content of each PDF page (or OCR for scanned TIFF/image documents)
- Detects the customer (end user) through automatic recognition patterns
- Categorizes files: each document is identified as Drawing, BOM, Spec or other
- Associates with parts: files are matched to the RFQ part numbers
- Extracts data using the customer-specific extractor
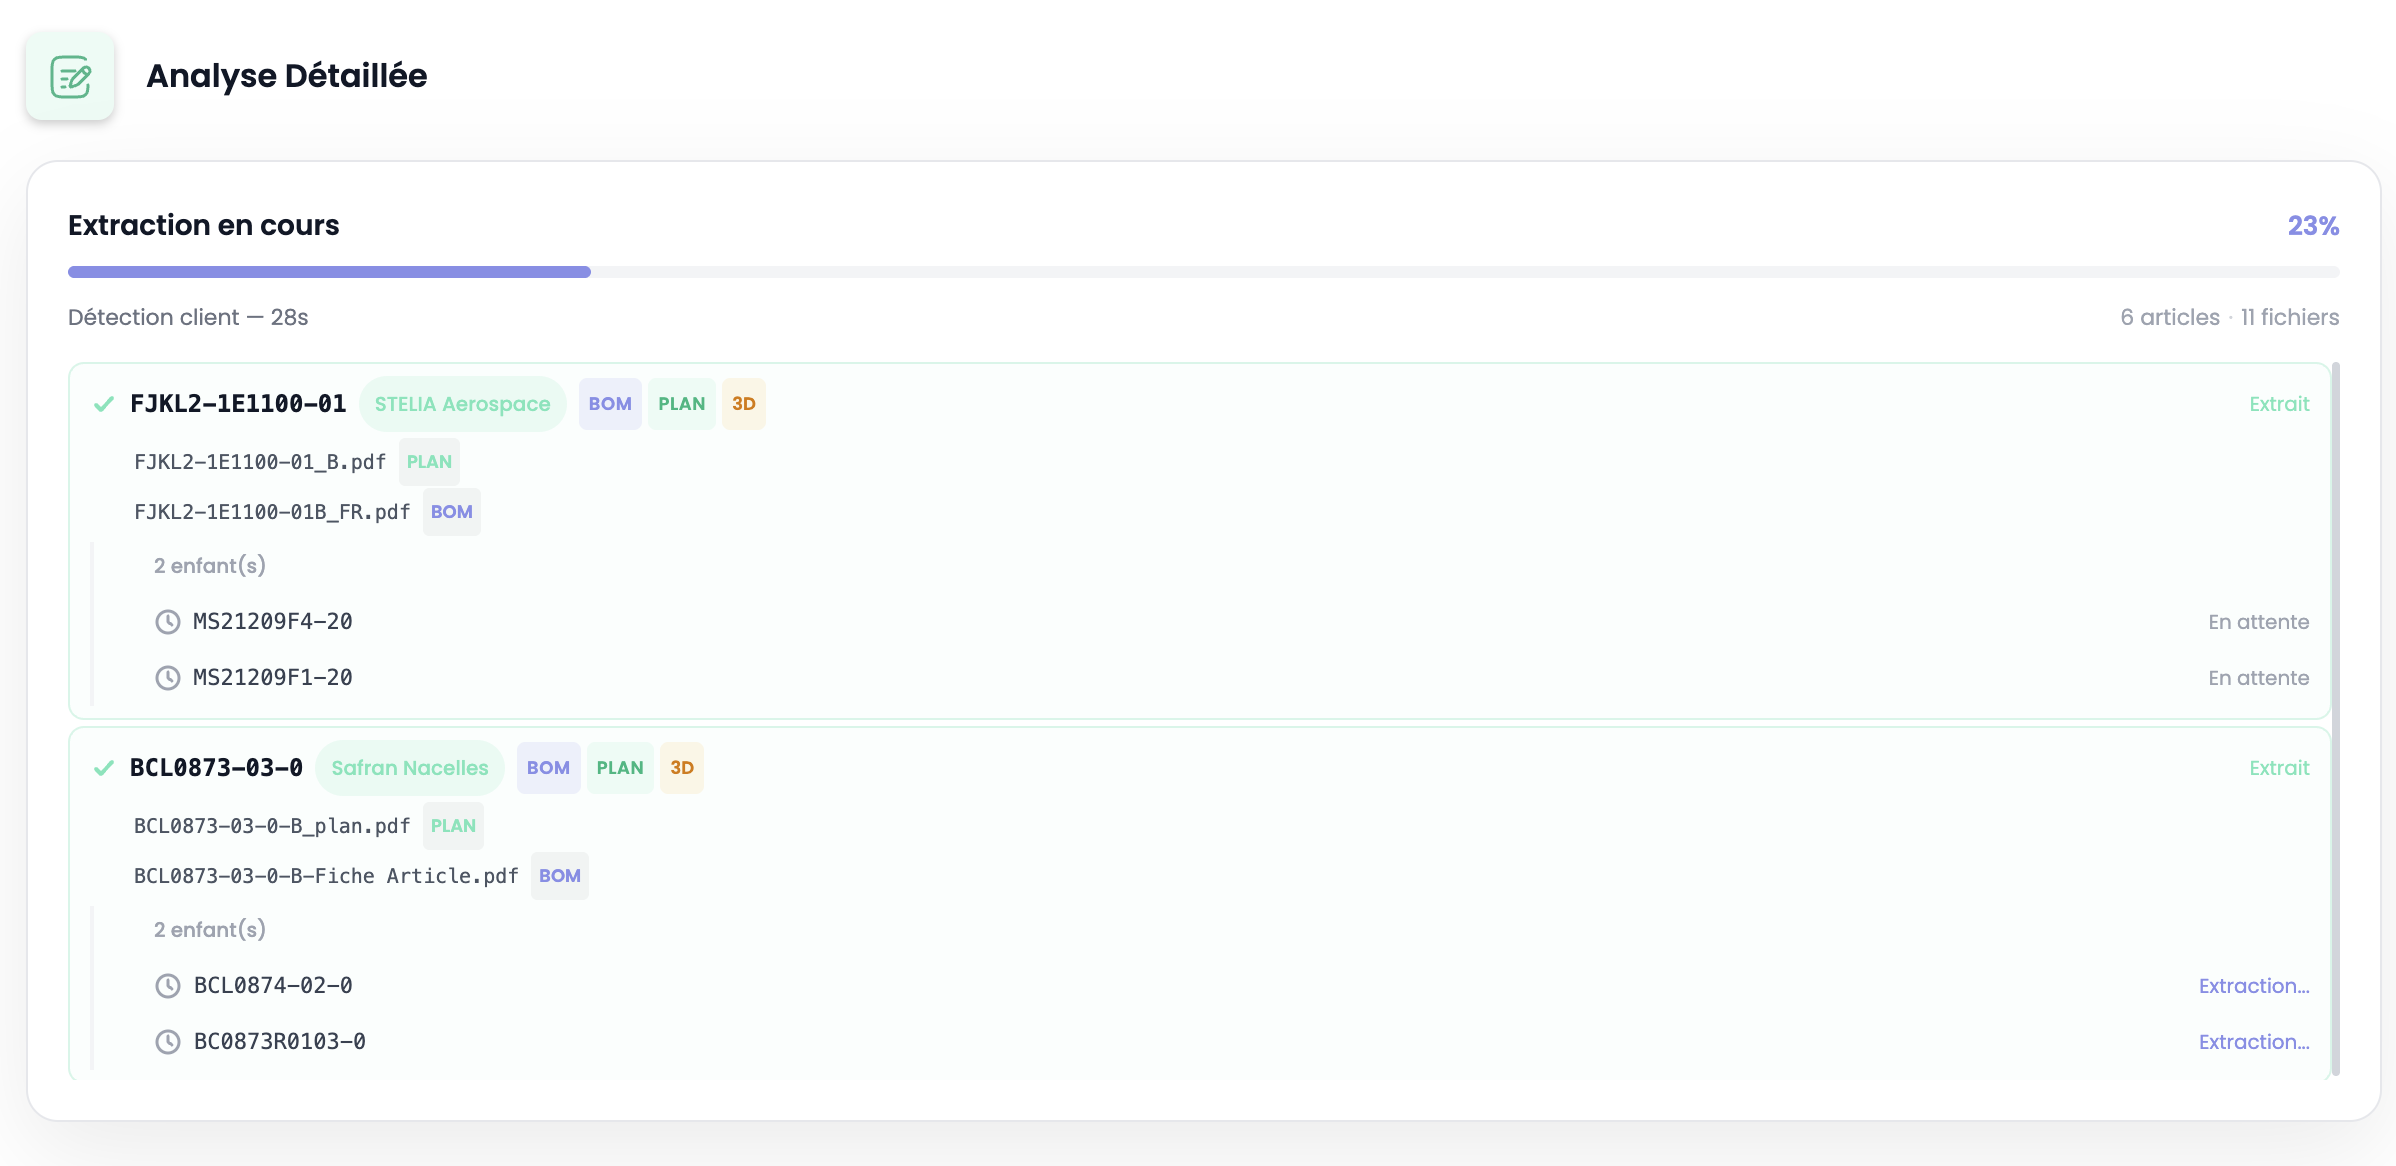
Progress bar
During extraction, the Detailed Analysis section is displayed with:
- A progress bar showing the completion percentage
- Elapsed time since the start
- Number of articles and files processed
- Per-part detail:
- Part number with detected customer badge (e.g. STELIA Aerospace, Safran Nacelles)
- Associated file tags: BOM, PLAN, 3D
- Identified child components with their status (Pending, Extracting…, Extracted)
INFO
Extraction is recursive for assemblies: when child components are identified in the BOM, they are automatically extracted in turn, down to elementary parts. Processing time depends heavily on the quality of imported documents (native PDF vs scan, image resolution, table readability).
Supported customers
| Customer | Status |
|---|---|
| Airbus A320 | Production |
| Airbus A350 | Production |
| Dassault Aviation STL | Production |
| Liebherr Aerospace | Production |
| Safran Nacelles | Production |
| Safran Seats | Production |
| SONACA | Production |
| STELIA Aerospace | Production |
INFO
New extractors are added regularly. Contact us if your customer is not yet supported.
Step 3 — Review results
Once extraction is complete, a table displays all extracted parts.
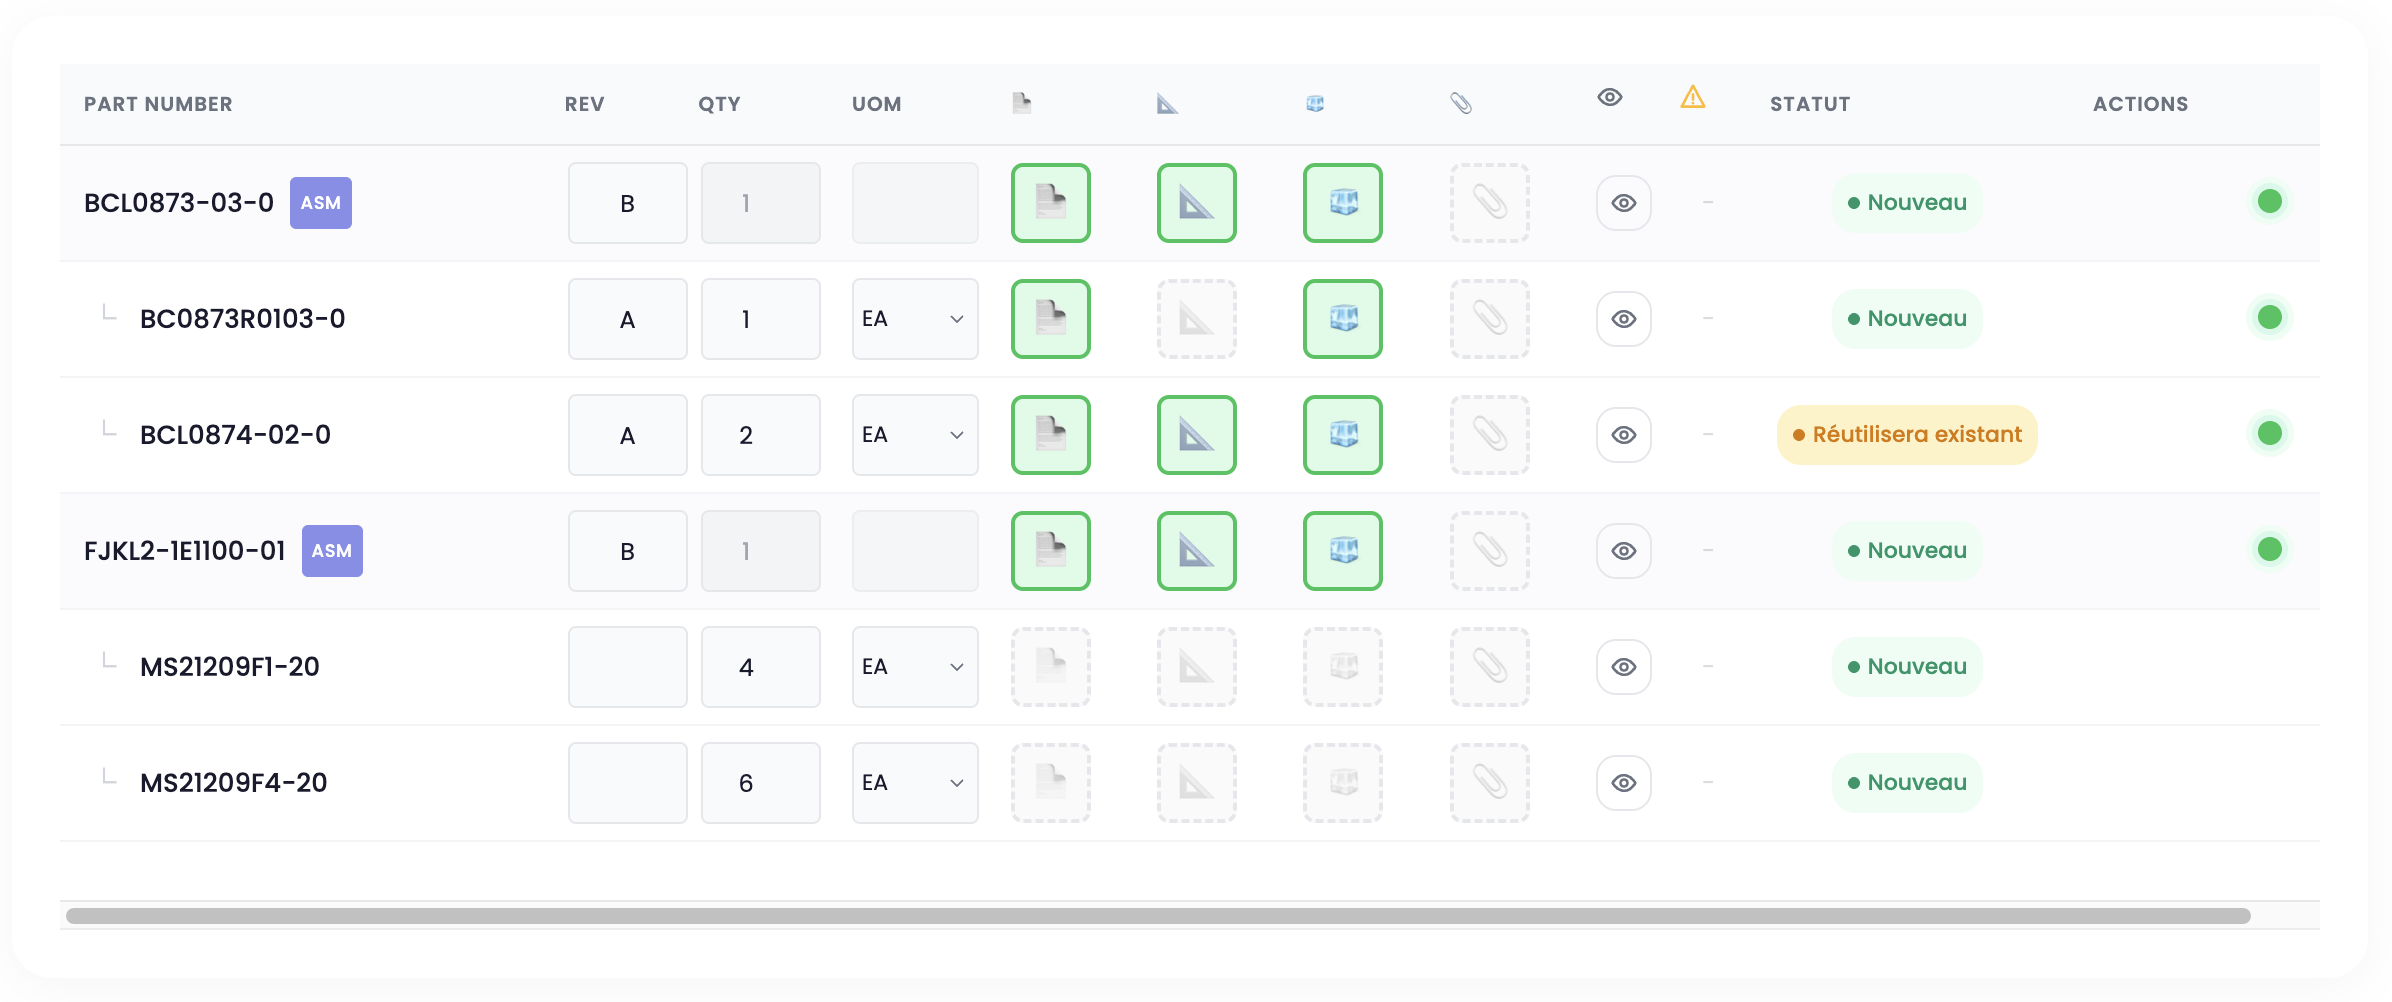
Table columns
| Column | Description |
|---|---|
| Part Number | Part reference. Assemblies carry the ASM badge. Child components are indented under their parent |
| Rev | Drawing revision (editable) |
| Qty | BOM quantity (editable for child components) |
| UOM | Unit of measure: EA, U, KG, M, L (editable for child components) |
| 📄 | PDF file (article sheet / BOM) |
| 📐 | Drawing file |
| 🧊 | 3D file (STEP) |
| 📎 | Miscellaneous file (spec, etc.) |
| 👁 | View files associated with the part |
| ⚠️ | Alerts detected during extraction |
| Status | Part state (see below) |
| Actions | Contextual action buttons |
Possible statuses
| Status | Meaning |
|---|---|
| New | Unknown part, will be created in the database |
| New (other rev: X) | The part already exists in a different revision (X). By default, a new record will be created |
| Will reuse existing | The part already exists in the same revision. Existing data will be preserved |
| Will duplicate from (X) | The user chose to duplicate data from existing revision X |
| Shared | Child part appearing in multiple assemblies (virtual row, not editable) |
Action buttons
When a part already exists in the database in a different revision, two actions are available:
| Button | Action | Effect |
|---|---|---|
| 📁+ (Create new) | Create a new record | Creates the part in the new revision without carrying over existing data |
| 📋 (Duplicate) | Duplicate from rev. X | Copies technical data (manufacturing steps, material, etc.) from the existing revision to the new one |
TIP
If the part was already processed in a previous revision, the Duplicate button saves time by carrying over the existing manufacturing steps.
Alerts
The ⚠️ symbol flags issues detected during extraction (missing data, inconsistencies). Hover over the icon to see the alert details.
When alerts are present, a summary button appears at the top of the table. Click it to open a modal listing all warnings and errors for the session, grouped by type.
Step 4 — Adjust data
Before validating, you can adjust the results:
Edit revision and quantities
The Rev, Qty and UOM fields are editable directly in the table. Click the field, modify the value — saving is automatic.
WARNING
Child component Qty and UOM fields are highlighted in orange when not filled in. Make sure all quantities are correct before validating.
Assign unmatched files
If some files were not automatically associated with a part, they appear in an Unmatched Files section below the table.
To assign them: drag and drop the file from the unmatched area to the corresponding column (📄, 📐, 🧊 or 📎) of the target part.
View part files
Click the 👁 (eye) button to open a modal showing all files associated with the part. From this modal, you can:
- Download a file
- Remove a file from the part (it returns to the unmatched files)
Step 5 — Validate data
Once results are reviewed and adjusted, click the Validate data button.

This triggers:
- Data migration: extracted parts are transferred to production tables (parts, technical data, BOM)
- 3D file processing: STEP files are sent to the compute server for volume analysis
Warning
Validation is final. Make sure all data is correct before clicking Validate data.
Next step
After validation, you can:
- Make the Bid/No-Bid decision for each part
- Access the extracted technical data in the Engineering tab